
We’ve Got You Surrounded

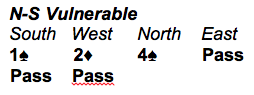 Perhaps East should have tried 5♦ over 4♠, that would be a cheap sacrifice if 4♠ is making. Instead, she guesses to defend and must find a nice defensive play if she is to justify her shyness in the bidding.
You are that shy East, so try looking at only the N-E hands. West leads the ♦K, won by Declarer’s Ace. A Diamond is ruffed in Dummy, followed by a Spade to Declarer’s Ace. Then a Club to Dummy’s Jack and your Queen. What next?
At this point, you cannot play a Club or a Diamond without blowing a trick, so you must shift to a Heart. Which Heart? It seems routine to play a low Heart, but let’s stop and think. If Declarer has the ♥K it won’t matter what you do, so let’s assume that West has the King. If West has the ♥J to go along with that King then you can shift to any old Heart, again it won’t matter. So the case to worry about is the one you see looking at all four hands.
Look what happens if you shift to a low Heart. Dummy plays low, West must play the King, losing to the Ace. That’s only one Heart loser for Declarer. The required shift is the Heart Ten! Your Ten and Eight have Dummy’s Nine “surrounded” and that’s what makes the surprising shift to the Ten the winning play. The Ten is covered by the Jack, King and Ace, after which East’s Q8 sits over Dummy’s 92, providing two Heart tricks for the defense.
Surrounding plays don’t happen every day, and are easy to miss in the heat of battle. But now that you are an expert on the subject you will no doubt spot this one right away:

East’s J9 surround Dummy’s Ten and it is a shift to the Jack which is the winning play, picking up the whole suit.
Article courtesy of the American Contract Bridge League. Visit www.acbl.org for more about the fascinating game of bridge.


