
The Merrimac Coup
Historians of the Spanish-American War will have no difficulty figuring out how this week’s coup got its exotic name. For the rest of us there is Google.
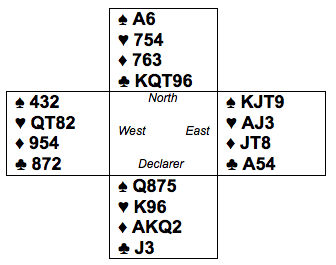

Against 3NT, West leads his 4th best Heart, and routine defense by East is to win the Ace and return the Jack. Declarer’s King wins that and Clubs are played. East can take his ♣A when he likes, West gets a couple of Hearts, but that is all there is for the defense. 9 tricks for Declarer.
Let’s replay the hand, this time with a wide-awake East at the table. He can see those ominous Clubs in Dummy and must knock out the ♠A before Declarer can set up the Clubs. That’s right, a Spade shift is required at Trick 2. But shifting to the ♠J does not get the job done. Declarer will hop up with her Queen, saving Dummy’s ♠A entry for later. What is needed is the spectacular shift to the ♠K, that does knock out Dummy’s entry (if the ♠K is ducked then East simply continues with another Spade). Nicely done! East’s sacrifice of the ♠K (the Merrimac Coup) shuts out the Clubs and is the only way to set the contract.
Of course, after the ♠A has been dislodged, East must keep up the good work by ducking one round of Clubs, in order to complete the job of shutting out the Club suit. Why not duck a second round in case Declarer started with three Clubs? West will help out by giving a count signal, playing the ♣2 on the first round. This “low-high” tells East that West started with an odd number of Clubs and therefore that Declarer does not have three. Ducking the second Club would be fatal as it happens, allowing Declarer to scamper home with two Spades, a Heart, four Diamonds and two Clubs.
Article courtesy of the American Contract Bridge League. Visit www.acbl.org for more about the fascinating game of bridge.


