
The Scissors Coup
This week’s deal features the Scissors Coup, so-called because it cuts communications between the two defenders.
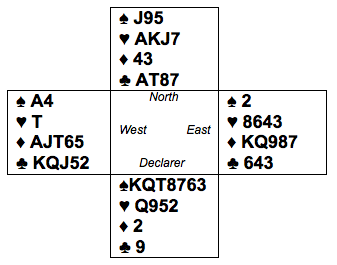
East’s 4♦ was preemptive, showing long Diamonds and not much else.
As West, what’s your opening lead? It would be reasonable to lead ♣K, attempting to set up a Club trick while you still have the ♠A entry. That doesn’t work on the actual deal because of Declarer’s Club singleton. A more promising plan might be to lead the singleton Heart, later winning the ♠A, then underleading the ♦A to East’s hoped-for ♦K, and getting a Heart ruff for down one. As you can see, that plan is the winner. Well, not quite, because there is a clever counter-measure. How can Declarer deprive West of his ruff?
Enter the Scissors Coup. Declarer wins the Heart lead in Dummy, and before touching trumps she cashes ♣A and leads another Club, pitching a Diamond when East plays low. By this maneuver Declarer trades a Diamond loser for a Club loser, in the process thwarting West in his plan to reach East with the ♦K. Now, with the defensive communications snipped, Declarer loses only the ♠A and a Club (but there is no Diamond loser and no Heart ruff).
Post Script: As West you no doubt found that well-thought-out Heart opening lead. Then as Declarer you made a clever play to bring home the 5♠ contract. Next, imagine that you hold the East cards, but with the ♣6 replaced by the ♣J. Now, after Dummy’s ♣A has been cashed, when a second Club is played, we are quite confident that you would alertly hop up with that ♣J, foiling the Scissors Coup. Nice play!
Article courtesy of the American Contract Bridge League. Visit www.acbl.org for more about the fascinating game of bridge.

