
Second Hand High
“Second hand low” is common advice, but this is a hand where it pays to ignore that recommendation.

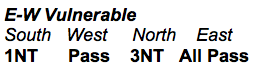
North saw no reason to mess about showing the minors, so she jumped straight to game in the most likely contract. West had the obvious lead of the ♠J, won by East’s Ace. Back came a Spade and Declarer could see 9 tricks if she could bring in the Diamonds. She finessed the ♦J, losing to the Queen. The defense cashed their Spades, but Dummy’s Diamonds were good. Declarer’s 9 tricks were a Spade, three Hearts, four Diamonds and a Club. Somebody goofed, who was it?
Yes, indeed, West was the goofster. We are always told “second hand low, third hand high” but (as usual) there are exceptions and this was one of them. When Declarer led that first round of Diamonds, West must hop up with the King! This alert play makes it impossible for Declarer to bring in the Diamonds for four tricks. If she takes the ♦A on the first round then East will duck the second round of Diamonds … and if Declarer ducks the first round then the best she can do is to score three Diamonds, which is not enough.
It’s a recurring theme. Dummy has AJTxx or AT9xx or some such holding … Dummy has no side-suit entries … West has the Queen or the King … and the winning play by West to play “second hand high” in order to jam Declarer’s communications.
Article courtesy of the American Contract Bridge League. Visit www.acbl.org for more about the fascinating game of bridge.


